「オンラインとオフラインの両方を Shopify で完結させたい」というニーズがあったときに、最初に連想する機能は Shopify POS です。
参考リンク
Shopify POS そのものの情報は少しづつ出てきていますが、POS を活用した事例や、POS で使えるアプリにかんする記事は少なく、特に開発にいたっては日本語での情報がほとんど見当たりません。(僕が知らないだけでここにあるよ〜という情報をお持ちの方はぜひ教えてください!)
見当たらないのであればやってみるしかない、ということで、POS を使ったアプリ開発を試してみました。この記事では Shopify POS を活用した開発のトライアルとして、POS上でクーポンを付与する機能を実装してみた際のメモをまとめています。
Cart app extension を利用する
オンラインでは実装している「クーポンを通じたディスカウント」を、オフラインでも同じように実現するために、Cart app extension を使用して、ユーザーに対してクーポンを付与していきます。
Cart app extension のエンドポイントを設定
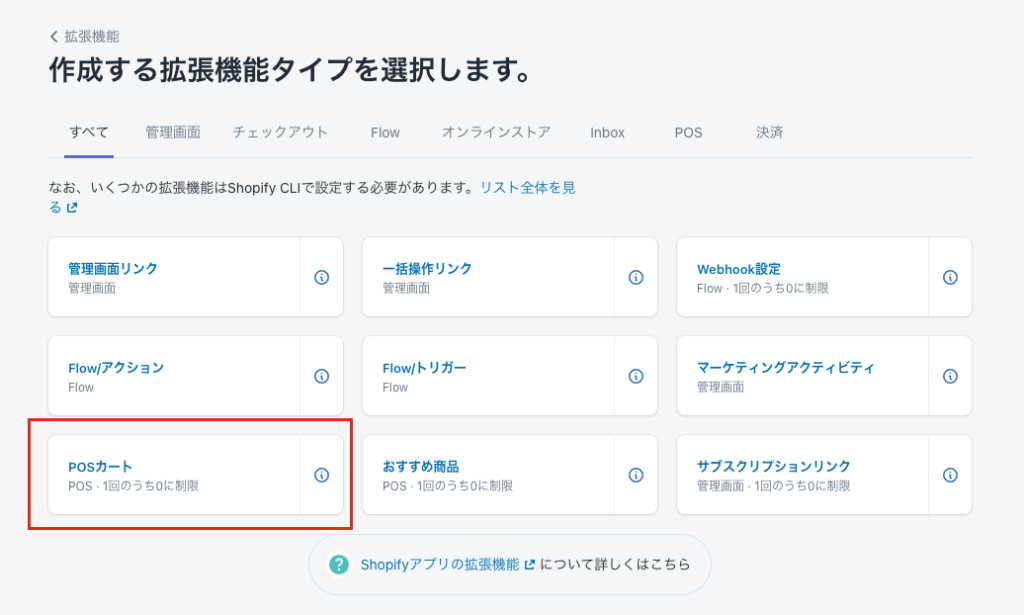
まず、パートナーダッシュボードから拡張機能として追加したいアプリを選択し、エンドポイントを設定します。ここではPOSカートを選択します。
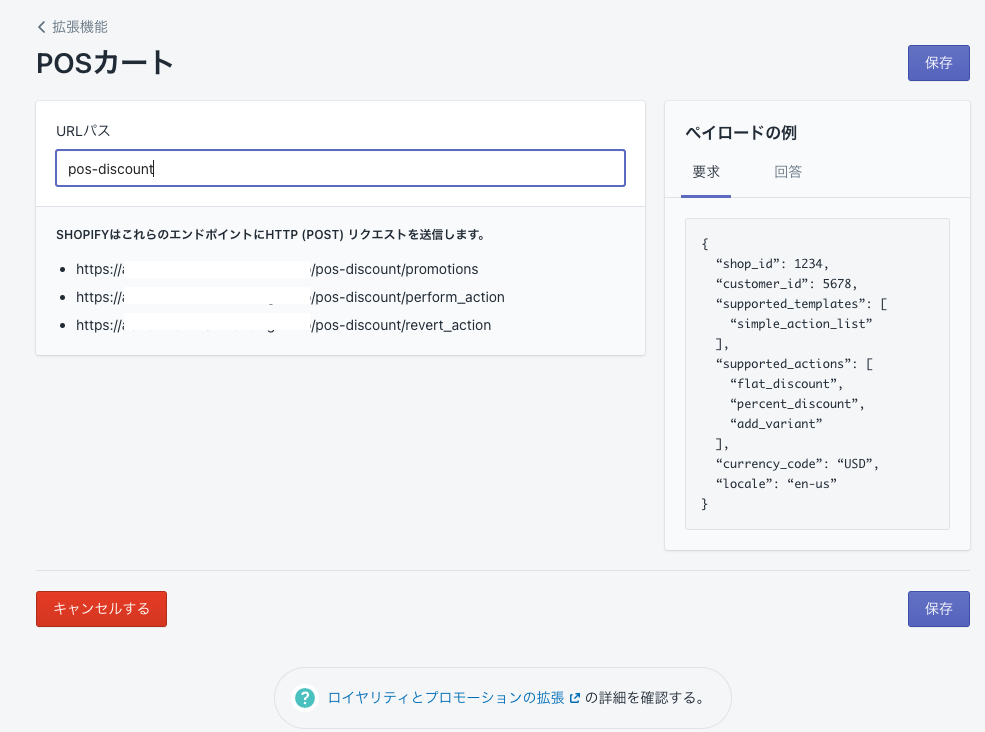
ここでエンドポイントを設定します。上記スクリーンショットの右側「ペイロードの例」と記載があるように、カート内で変更があるたびにペイロードを受け取れるようになります。
Shopify POS アプリを埋め込む
上記で作成した拡張機能を使うには Shopify POS アプリの埋め込み設定が必要なので、さっそく設定していきます。
まず、パートナーダッシュボードのアプリ管理からアプリを選択して、アプリ設定の中の埋め込み式アプリを選択します。

ここで、 Shopify POS のアプリに埋め込む を有効にすると、拡張機能が Shopify POS で利用できるようになります。
Shopify POS に拡張機能を設定する
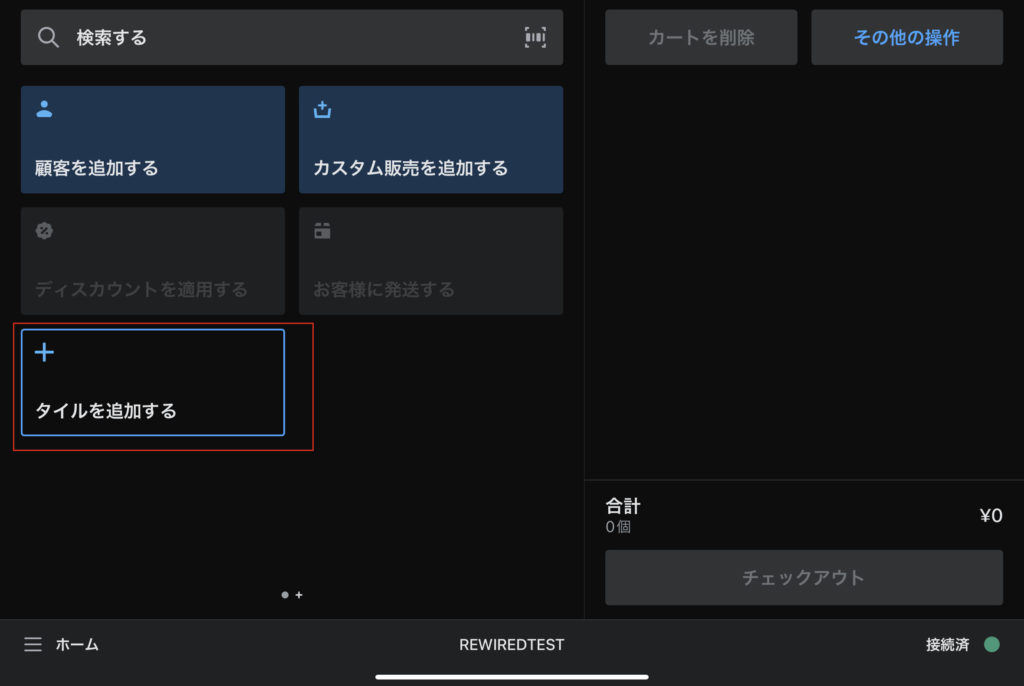
上記で設定した拡張機能を使用するには、Shopify POS に「タイル」を追加します。
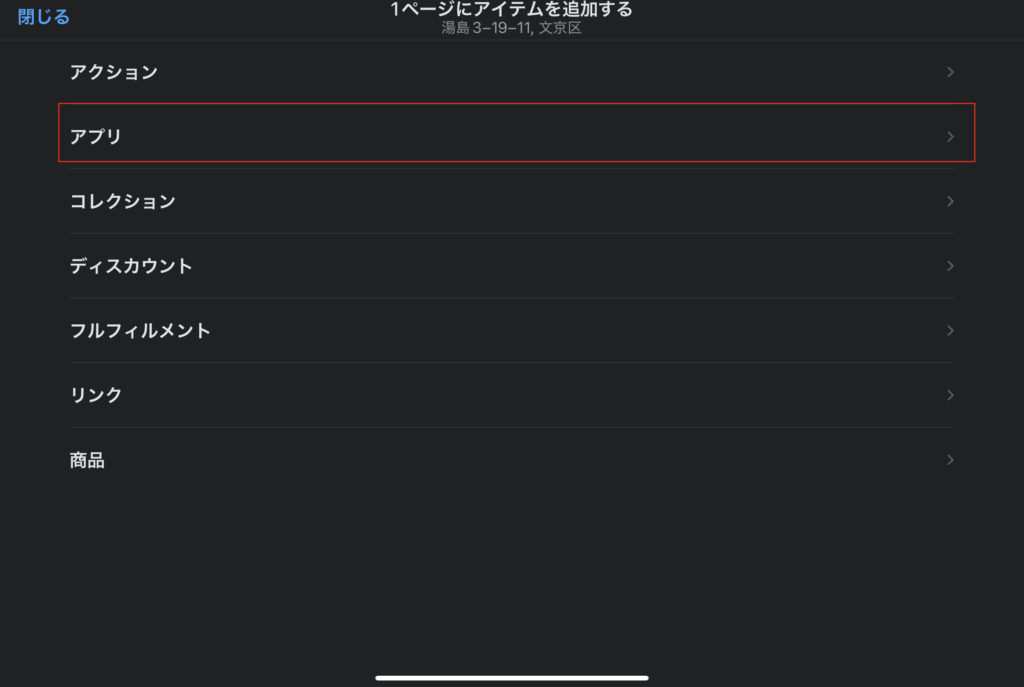
タイルを追加する
アプリ を選択
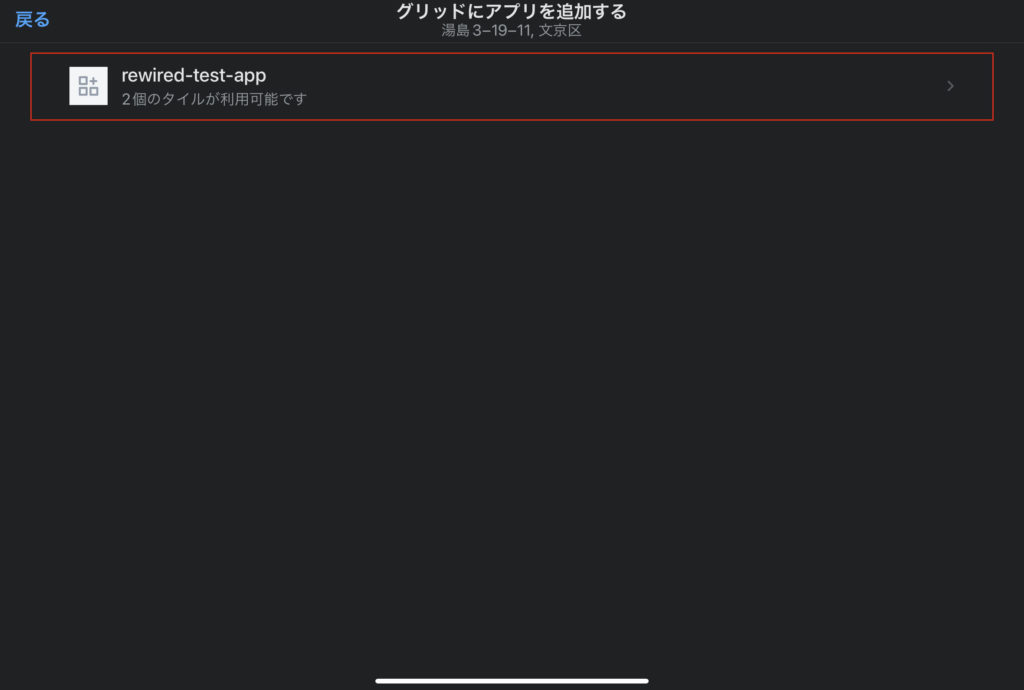
タイルにアプリを設定
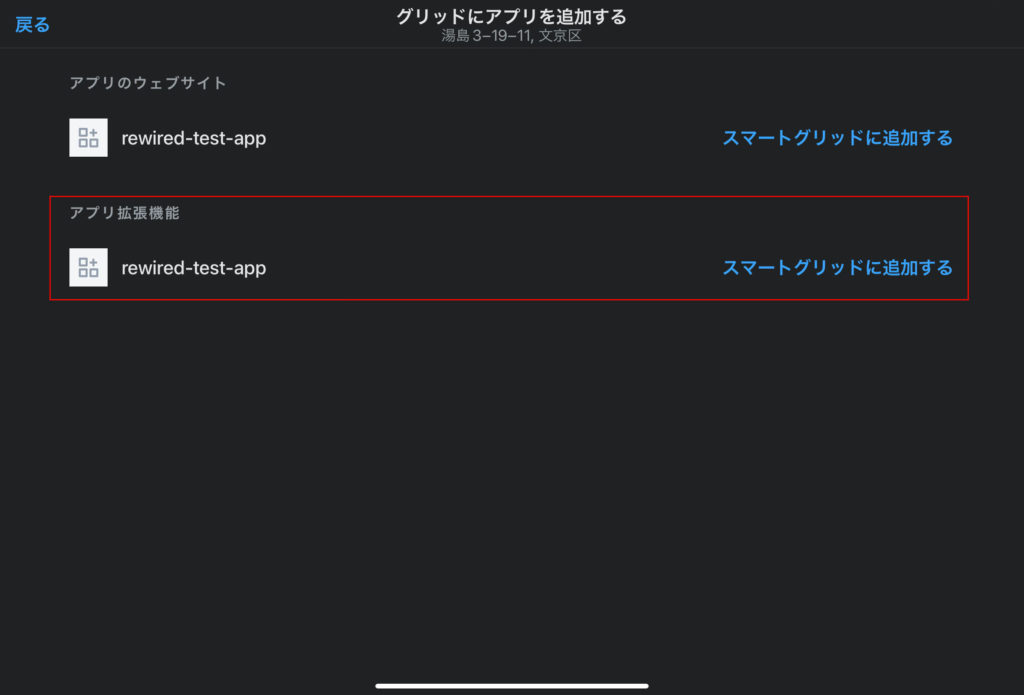
拡張機能を選択
タイルの追加が完了
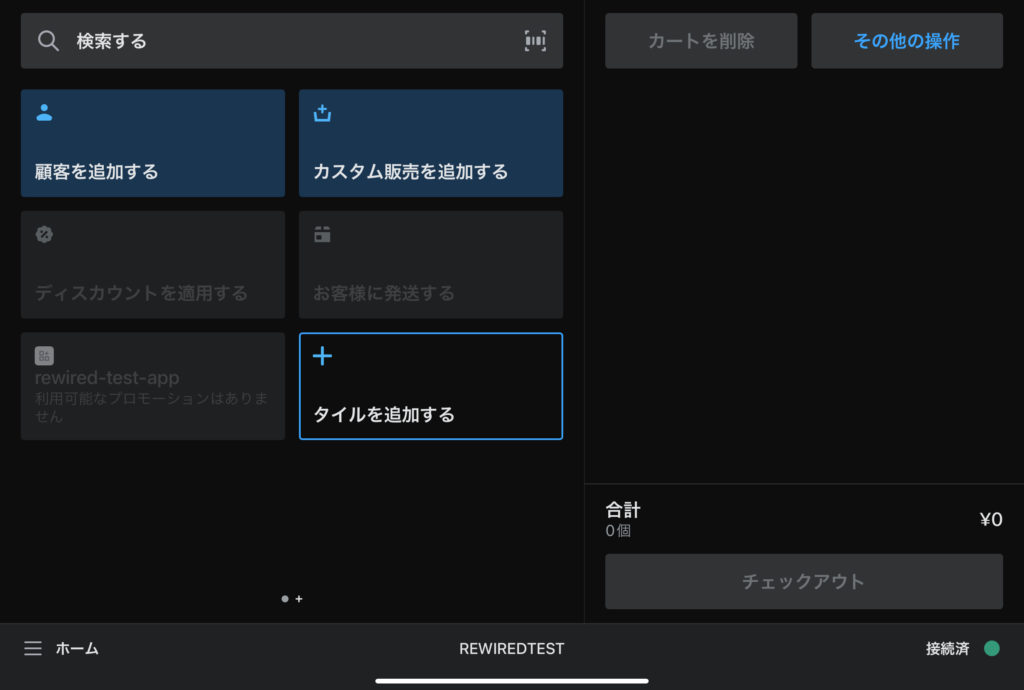
これでタイルが追加されましたが、この段階ではまだプロモーションは使えませんので、次のステップで有効化します。
エンドポイントを使って、タイルを利用可能にする
設定したエンドポイント/promotionsからユーザー情報を受けとり、指定の値を返す
/promotionsで受け取れるペイロード
{
		shop_id: ********,
		shopify_domain: 'rewiredteststore.myshopify.com',
		supported_templates: [ 'simple_action_list' ],
		supported_actions: [ 'flat_discount', 'percent_discount', 'add_variant' ],
		locale: 'ja',
		currency_code: 'JPY',
		customer_id: ********,
		customer_email: 'rewiredteststore@rewired.jp'
	}
/server/index.js
app.post("/pos-discount/promotions", async (req, res) => {
    const body = {
      type: 'simple_action_list',
      points_label: '500円割引',
      points_balance: 'サマークーポン',
      actions: [
        {
          type: 'flat_discount',
          title: 'クーポンを利用する',
          description: '期間限定クーポン',
          action_id: '123ABC',
          value: '500',
        },
      ],
    };
    res.status(200).send(body)
  });
上記は、顧客情報を Shopiy POS で選択した時に、/promotions のエンドポイントに設定値を返すための記述です。このコードの設定値だと Shopify POS では以下のようにレンダリングされます。

実際にこのクーポンを利用するときのエンドポイントが/perform_actionです。
/perform_action で受け取れるペイロード
{
		shop_id: ********,
		shopify_domain: 'rewiredteststore.myshopify.com',
		supported_templates: [ 'simple_action_list' ],
		supported_actions: [ 'flat_discount', 'percent_discount', 'add_variant' ],
		locale: 'ja',
		currency_code: 'JPY',
		customer_id: ********,
		customer_email: 'rewiredteststore@rewired.jp',
		action_id: '123ABC'
	}
顧客情報を Shopiy POS で選択した時に、/perform_actionのエンドポイントに設定値を返すための記述が以下です。
/server/index.js
app.post("/pos-discount/perform_action", async (req, res) => {
    console.log(req.body)
    const body = {
      type: 'simple_action_list',
      points_label: '500円割引',
      points_balance: 'サマークーポン',
      actions: [
        {
          type: 'flat_discount',
          title: 'サマークーポン',
          description: '期間限定クーポン',
          action_id: '123ABC',
          value: '500',
        },
      ],
    };
    res.status(200).send(body)
  });
こちらの設定値ですと Shopify POS ではこのようにレンダリングされます。
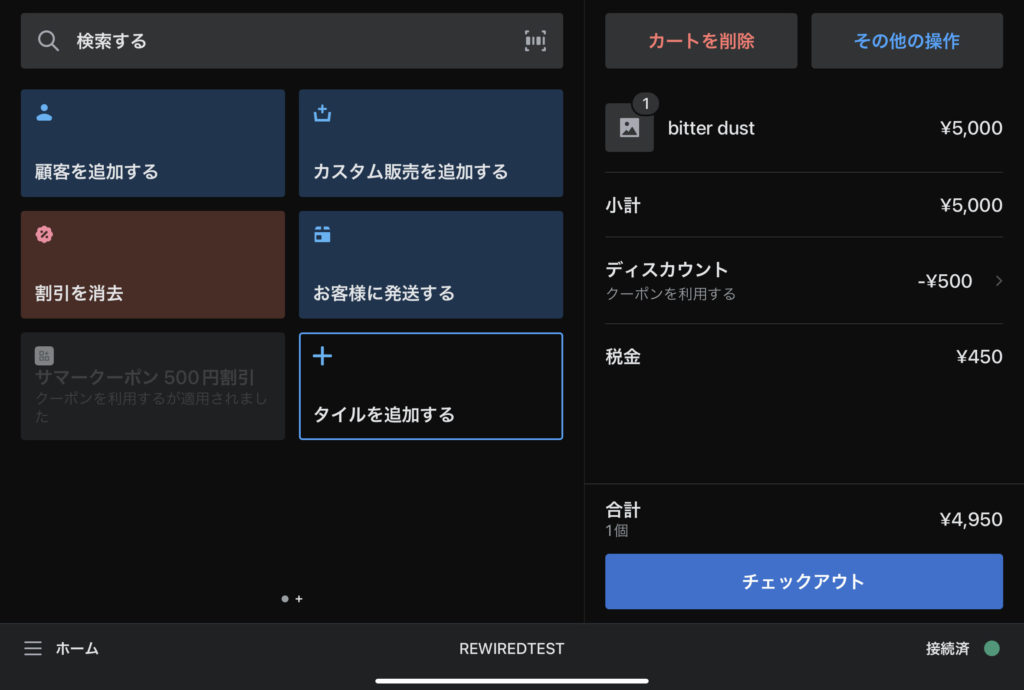
続いて、割引情報を削除するときの処理です。エンドポイントは /revert_action になります。
/revert_action で受け取れるペイロード
{
		shop_id: ********,
		shopify_domain: 'rewiredteststore.myshopify.com',
		supported_templates: [ 'simple_action_list' ],
		supported_actions: [ 'flat_discount', 'percent_discount', 'add_variant' ],
		locale: 'ja',
		currency_code: 'JPY',
		customer_id: null,
		customer_email: null
	}
顧客情報を Shopiy POS で選択した時に、/revert_actionのエンドポイントに設定値を返すための記述が以下です。
/server/index.js
app.post("/pos-discount/revert_action", async (req, res) => {
    console.log(req.body)
    const body = {
      type: 'simple_action_list',
      points_label: '500円割引',
      points_balance: 'サマークーポン',
      actions: [
        {
          type: 'flat_discount',
          title: 'サマークーポン',
          description: '期間限定クーポン',
          action_id: '123ABC',
          value: '500',
        },
      ],
    };
    res.status(200).send(body)
  });
削除すると、元の設定値どおりの表示になります。

カート内でディスカウントを適用させる
続いて、POS links を使い、カート内に指定のディスカウントを適用させていきます。
まず、パートナーダッシュボードのアプリ管理からアプリを選択して、アプリ設定の中の「埋め込み式アプリ」を選択します。
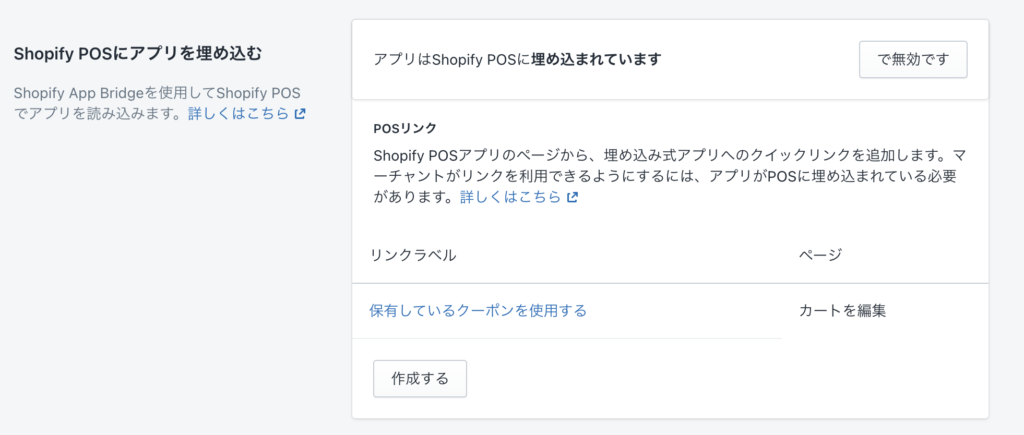
作成するボタンをクリックすると、POS links の作成画面が出るので、入力していきます。
今回のリンクは /POS 内に設置しようと思います
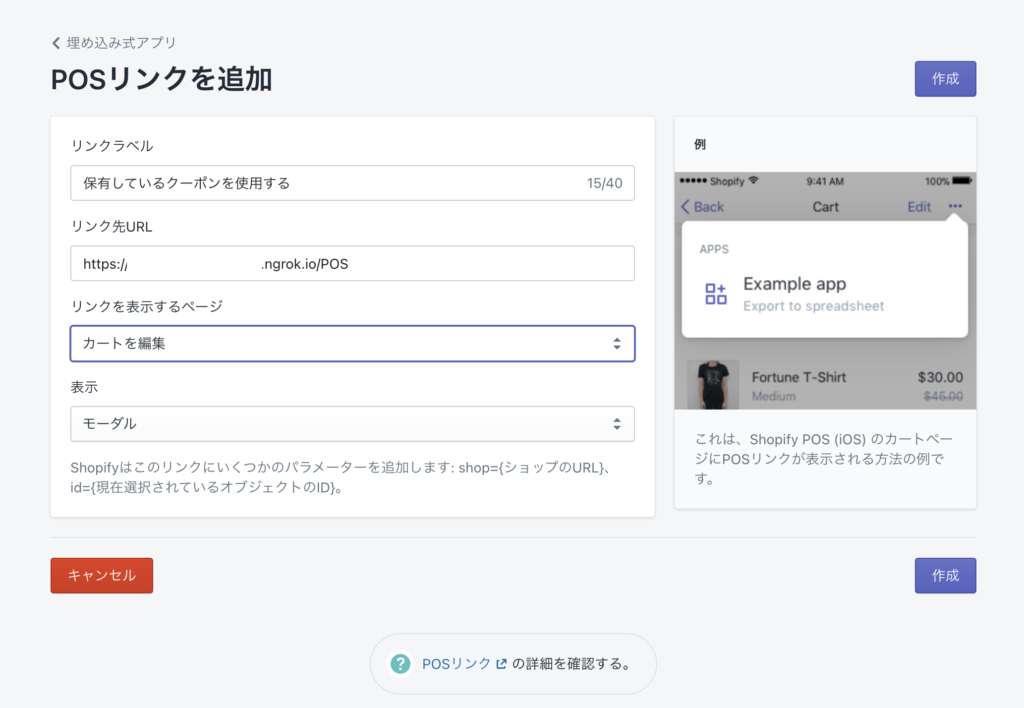
あとは作成ボタンを押せば、保存されて POS links が設定されます。
Shopify POS アプリにタイルを追加する
タイルの追加方法は Cart app extension のときと同じです。 POS links はアクション内に追加されます。
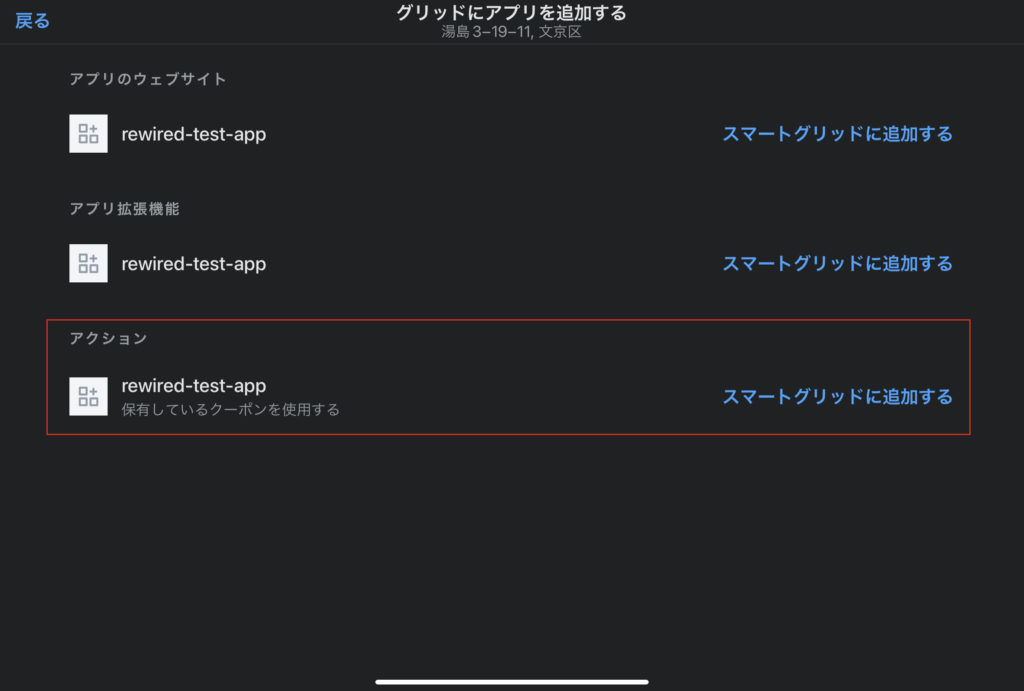
追加すると、このように設定通りにタイルが表示されます。
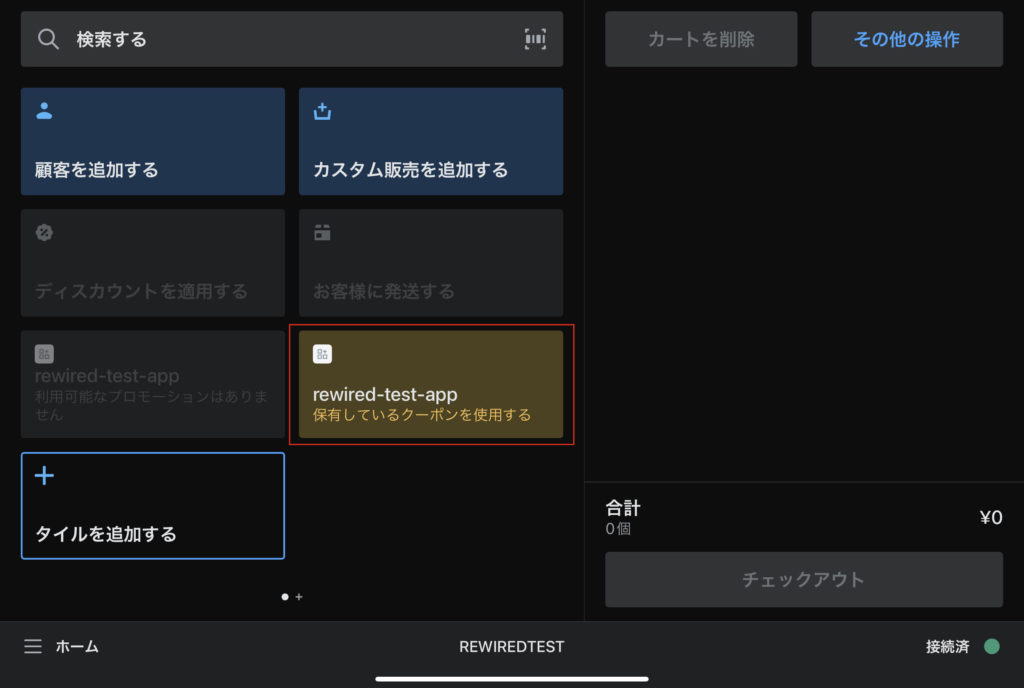
この状態ではまだアプリ内に /POS の機能が実装されていないので、以下のステップで作成していきます。
POS links用画面の作成
管理画面の完成図は以下のように、クーポン使用すると Shopify POS のカートにクーポンを適用できる機能が実装されている状態です。
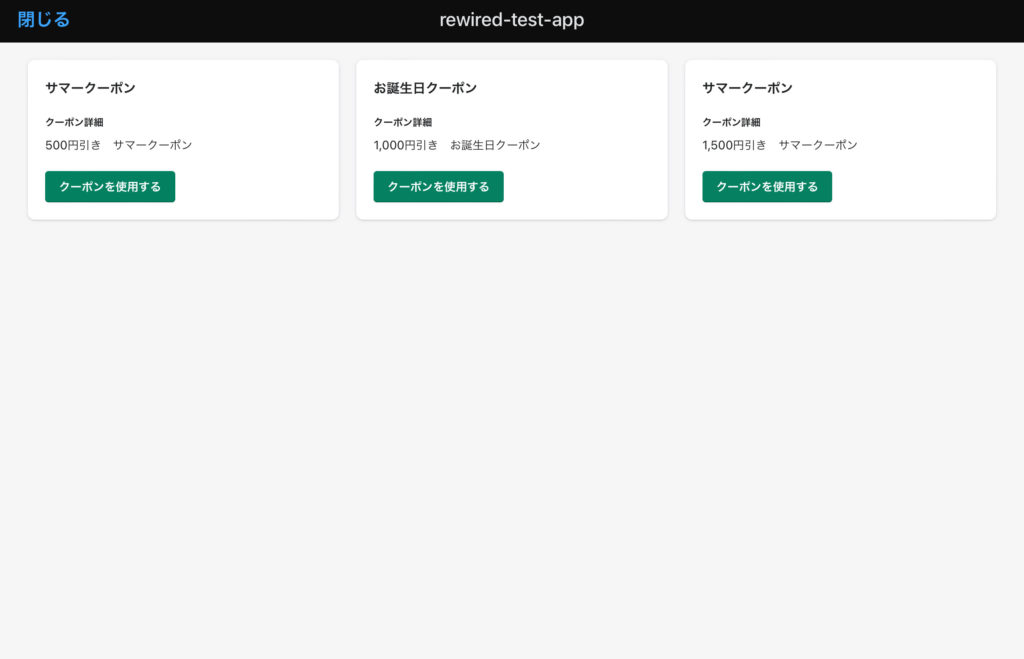
画面用のコード
import {
  Card,
  Page,
  Layout,
  Toast,
  Frame,
} from "@shopify/polaris";
import { useAppBridge } from "@shopify/app-bridge-react";
import { Cart } from '@shopify/app-bridge/actions';
import React, { useState, useCallback } from 'react';

export function POSLink () {

  const [active, setActive] = useState(false);

  const toggleActive = useCallback(() => setActive((active) => !active), []);

  const toastMarkup = active ? (
    <Toast content="クーポンを適応しました" onDismiss={toggleActive} />
  ) : null;

  const app = useAppBridge();
  const Discount = (value) => {
    // setActive(true)
    const discountPayload = {
      discountDescription: value,
      discountCode: value,
    }
    const cart = Cart.create(app);
    const unsubscriber = cart.subscribe(
      Cart.Action.UPDATE,
      function (payload) {
        console.log('[Client] setDiscount', payload);
        unsubscriber();
      },
    );
    cart.dispatch(Cart.Action.SET_DISCOUNT, {
      data: discountPayload
    });

  }

  return (
    <Frame>
    <Page fullWidth>
      <Layout>
        <Layout.Section oneThird>
      <Card
        title="サマークーポン"
        footerActionAlignment='left'
        primaryFooterAction={{content: 'クーポンを使用する',onAction:()=>{
          Discount('SUMMERSALE');
          toggleActive();
        }}}
      >
         <Card.Section title="クーポン詳細">
        <p>500円引き サマークーポン</p>
        </Card.Section>
      </Card>
      </Layout.Section>
      <Layout.Section oneThird>
      <Card
        title="お誕生日クーポン"
        footerActionAlignment='left'
        primaryFooterAction={{content: 'クーポンを使用する',onAction:()=>{
          Discount('BIRTHDAY');
          toggleActive();
        }}}
      >
      <Card.Section title="クーポン詳細">
        <p>1,000円引き お誕生日クーポン</p>
        </Card.Section>
      </Card>
      </Layout.Section>
      <Layout.Section oneThird>
      <Card
        title="サマークーポン"
        footerActionAlignment='left'
        primaryFooterAction={{content: 'クーポンを使用する',onAction:()=>{
          Discount('SUMMERSALE2');
          toggleActive();
        }}}
      >
      <Card.Section title="クーポン詳細">
        <p>1,500円引き サマークーポン</p>
        </Card.Section>
      </Card>
      </Layout.Section>
      </Layout>
      {toastMarkup}
    </Page>
    </Frame>
  );
}
カートページのデータの取得や商品、顧客、ディスカウントの追加は AppBridge の Cart を使用することで実現しています。
参考リンク
上記のディスカウントコードをカートにセットするコードは以下になります。
カートにディスカウントを設定
  const app = useAppBridge();
  const Discount = (value) => {
    // setActive(true)
    const discountPayload = {
      discountDescription: value,
      discountCode: value,
    }
    const cart = Cart.create(app);
    const unsubscriber = cart.subscribe(
      Cart.Action.UPDATE,
      function (payload) {
        console.log('[Client] setDiscount', payload);
        unsubscriber();
      },
    );
    cart.dispatch(Cart.Action.SET_DISCOUNT, {
      data: discountPayload
    });
こんな感じになりました!
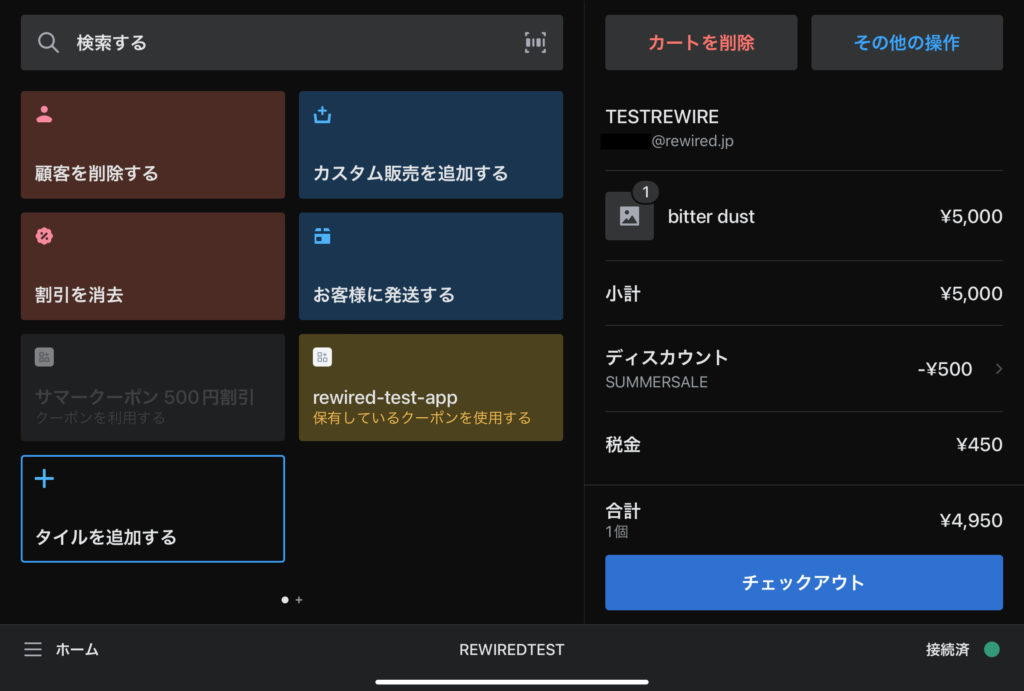
まとめ
今回は Shopify POS を使用することで、オンラインでの体験をかんたんにオフラインでも展開ができるアプリを作ってみました。
POS が使えると、たとえばポップアップストアといったテンポラリな場面でもオンラインの顧客へのオフライン誘導がスムーズに行えますし、管理も Shopify で一元化できるのでオペレーション的にもシンプルです。今回の記事で作成した簡易アプリのように、拡張機能を使うことでオフライン独自の特典を作ったりすることもできるでしょう。
App Store には Shopify POS 対応のアプリもたくさんでていますし、Omni Hub のような Shopify と他社POS との連携のアプリもあります。ご自身のストアの状況に合わせてどんな活用が可能なのか、試してみるのもいいかもしれません!

